
Tuesday, November 24, 2009
Dynamic Event-Example for multiple controls value change event
See the simple example picture to know how to use dynamic event for multiple controls value change event. Using this method user can give only one value change event for all the referenced controls.


Sunday, December 7, 2008
Creating & Using Functional Global in LabVIEW
An un-initialized shift register with in the single run loop (Before LabVIEW 8.5 ) VI is Functional global. This VI must having Read & Write operation. Functional global is also called as LV2 global.
This is similar to global variable (Used to read & write the values among the VI’s ).
Some advantages are,
* Avoid racing in value read & write operation
* Easily used among VI’s & subVI’s
* Modification & Addition of more operation is easy
Do not set Reentrant execution property in Functional global VI because it will make racing.
The basic method for creating Functional Global is given below (See Picture)


Operation enum having Write & Read item. In write case value is stored into shift register .In Read case stored value is getting in the Value Out variable. This stored value is kept in the shift register upto the LabVIEW application is closed. You can use while loop with single run as a Functional global.
This is similar to global variable (Used to read & write the values among the VI’s ).
Some advantages are,
* Avoid racing in value read & write operation
* Easily used among VI’s & subVI’s
* Modification & Addition of more operation is easy
Do not set Reentrant execution property in Functional global VI because it will make racing.
The basic method for creating Functional Global is given below (See Picture)


Operation enum having Write & Read item. In write case value is stored into shift register .In Read case stored value is getting in the Value Out variable. This stored value is kept in the shift register upto the LabVIEW application is closed. You can use while loop with single run as a Functional global.
Wednesday, May 28, 2008
Tips for timestamp calculations
I was studied the article “LabVIEW tip: easy relative timestamp calculations” from this link.This method is very simple for calculation with Timestamp control.The addition of day,year,hour,min,sec is also done by this method .DBL data type constant with unit label is used for these calculations.See the attached picture for adding one day with time stamp control .
.
 .
.
Tuesday, May 27, 2008
Creating Text Labels instead of numeric scale in controls (Gauge,Slide,Dial etc)
Controls like Gauge,Slide,Dial are DBL data type(by default) & having the numeric limits with changeable scale .If you want Text Label for Dial, Gauge… controls follow this method.
Right click on the control->select Text Labels option & Edit the Text Display which is contains the min & max labels as default. The attached picture shows the Dial control with Level 1 to Level 5 text labels.
Right click on the control->select Text Labels option & Edit the Text Display which is contains the min & max labels as default. The attached picture shows the Dial control with Level 1 to Level 5 text labels.

Friday, May 23, 2008
Creating multiple Controls/Indicators in Front Panel without using any additional variables
In Front Panel multiple Controls/Indicators with same behaviour without using any additional variables is attained by Advanced ->customize option of that control (or) indicator.First select Digital Display option of the control from Right click the control ->Visible Items-> Digital Display then go to customization. Replace the Digital Display by any other control like Gauge, Meter...etc. Repeat the customization to replace the digital display of the new custom control with another control. (See Picture)


Wednesday, May 21, 2008
Disable the Numeric control entry field
In run time restrict the user from typing something into the entry field of the numeric control (or) String control is easily done by the following trick.
Select a "flat box" from decorations->Flat box, resize/move it to exactly cover the Numeric control user entry field and paint it transparent . Group it the flat box & Numeric control and also select “Skip this control when tabbing" option in the key navigation dialog of the control to avoid the tabbing access of the control.
Select a "flat box" from decorations->Flat box, resize/move it to exactly cover the Numeric control user entry field and paint it transparent . Group it the flat box & Numeric control and also select “Skip this control when tabbing" option in the key navigation dialog of the control to avoid the tabbing access of the control.
Thursday, April 10, 2008
Tips for getting Drive List of the system
To get the drive list of our system in LabVIEW is obtained by List Directory function which is lied in the Functions Palette -> File I/O -> Advanced File Functions -> List Directory. If you giving empty path as directory path of List Directory function you get the drive list of the computer from the directory names string array. (See Picture).It is a very cool & nice feature in LabVIEW.


Using Description and Tip option
Description and Tip is a very useful option for the controls & Indicators in front panel. Right click on the control or Indicator & select the Description and Tip option. Tip is a popup tool tip shows on run time when mouse over the Front Panel element. Description shows on Ctrl + H help window for the Front Panel element.(See Picture for selecting this option for control) 
You can change the Description and Tip of Front Panel elements on run time by its property nodes.

Tuesday, April 8, 2008
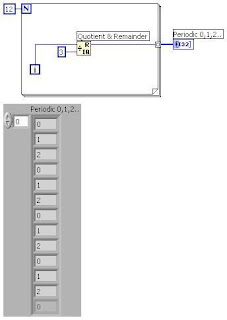
Generating alternate numbers periodically
For getting the alternate numbers in loop periodically is obtained by Quotient & Remainder function. If u like to generate the numbers 0,1,2 periodically means connect the Loop iteration (while or for loop based on usage) terminal to Quotient & Remainder function x input & create constant 3 on y input(constant should be addition of one with last number in the periodic numbers).See picture1 for Example(four periods of 0,1,2 numbers generation).

Monday, April 7, 2008
Tips for Unit Conversion
I was studied the article " easy unit conversion " from the following link.
This method is very simple for unit conversion without using the unit label of the control.
This method uses the function - Convert Unit. (See Example)

This method is very simple for unit conversion without using the unit label of the control.
This method uses the function - Convert Unit. (See Example)

Monday, March 17, 2008
Tips for creating Sub VI
Everyone knows the method of creating the SubVI by using wiring tool & connector pane (click on control & click on necessary connector pane terminal).The easy & quickest method for creating the SubVI is,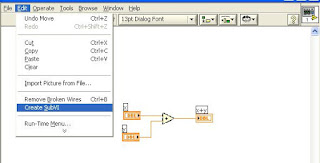
Select the part of the code which one you like to create as a SubVI & go to Edit menu then select the option “Create SubVI”(See Picture 1) .Now the selected part of the code is automatically converted into a SubVI(See Picture 2).


Tuesday, March 11, 2008
Tips for insert the function in-between wiring
Inserting the function tool in-between wires is easily done by right click->Insert->select tool from function palette. For two input function (like Add,Subtract… ) insertion in-between wiring you have two options, if you like to insert the first terminal of the function on the wiring- Right click below the wiring and insert it or you like to insert the second terminal of the function on wiring- Right click above the wiring and insert it. (See Picture 1)


Sunday, March 9, 2008
Swapping the wire terminals (two input function)
If you have function of two inputs like Add, Multiply…etc , you can easily swap the input wire terminals without deleting the wires. For example you have connected x1,x2 as input terminals in Subtract function, the swapping of x2 into x1 and x1 into x2 is done by the following method,
Keep auto tool selection enable – move the mouse over subtract function input terminals and press control key you got a symbol like -8 just click it now you got swapped input terminals.
Subscribe to:
Posts (Atom)